Showing posts with label Smashbox. Show all posts

Friday, June 3, 2016

[Collection] Part 4: Bronzers, Highlighters and Blushes Collection 2016

Hello,

Hmm...part 4...I actually do have way too much make up. I always know I have a lot, but when I take them all out, categorize them, and carefully go through the whole collection; I was really surprised and overwhelmed by how much I have. Through the process I discovered several products I totally forgot about. I encourage you all to go through your collection, take out expired products, giveaway products you don't use, you might discover some old favorites you forgot about. Okay, let's get started.

Bronzers and Highlighters


Tarte Amazonian Clay Waterproof Bronzer (in Park Avenue Princess)


Benefit Watt's UP
  • I'm not a big fan of this product, I find that it clings on to my dry patches. Especially on my nose where it tends to flake up, this product only enhances the look of the dryness. The color is beautiful tho, I just don't like how it applies on me.
Benefit Dandelion Shy Beam
  • I like this one more than the Watt's Up. It adds such a beautiful glow without looking shimmery/ glittery. It truly looks like a natural glow
Chanel- Lumiere Highlighting Blush (in 12 Coups De Minuit)
Smashbox- Step by Step Contour Kit


  • As you can see the contour shade on the very left has hit pan because I love it so much. I also love how natural looking the highlighter looks. Again, not glitters/ shimmers it just brightens up the area you applied it to. As of the bronzer in the center, I don't remember using it at all. I wish I can just purchase a refill of the contour shade.
Blushes


Left to right: color pop-> Nars

Colour pop- Super shock cheek (in Fox)
  • Here's a link 1 to the posts I talked about this blush
Tarte Amazonian Clay 12-hour Blush (in Blissful)
  • By now you are probably familiar with Tarte's blushes. Easily blendable, last all day and with beautiful color. This one here is the newest to my collection and the formula is just the like otheres.
Benefit BeneTint
  • I don't really reach for this anymore. I find it hard to use on the cheeks as it dries too fast and often time it leaves a red/ unblended mark on my face. The color is really pretty and it smells really good, I prefer to use them on my lips instead of cheeks.
Chanel- Sunkiss Ribbon Blush
  • check out my review of the blush here
Chanel- Cream Blush (in 65 Affinite)
  • I'm sad that Chanel discontinued their cream blushes. This shade is so natural as it gives the illusion of your natural blush after a work out or being in the cold. A little goes a long way with this formula but it can be blended out really easily, so don't worry if you accidentally put on too much. 
Nars Blush (in Orgasm)
  • This is supposedly Nars best selling blush. I have to say, I agree, the color is gorgeous. However,  I hardly use it because it is super glittery, I can't handle it!
That is all for the part 4 of my makeup collection. As you probably noticed, my most used from the bronzer/ highlighter categories are the Smashbox step by step contour kit and the Chanel highlighting blush (actually a highlight) and my most used blush has to be the Colour Pop blush.

In case you missed it:
My Chanel Collection (click here)
Part 1: Eyeshadow Palettes collection (click here)
Part 2: Foundation Collection (click here)
Part 3: All About That Face (click here)
Stay tuned for Part 5 of my collection!

Yours Truly,

Ting

Find me here:
Instagram: @judyy116
Twitter: @jtingsdiary
Email: jtingsdiary@gmail.com

*Disclaimer: my makeup collection posts are not meant to brag, I wanted to document what I own and I was also requested to share. I know I have a lot of makeup, I'm trying to downsize and use everything I have, that's why I'm on a no buy!

Tuesday, May 24, 2016

[Collection] Part 3: All About That Face 2016

Hello,

I hope you are enjoying my collection series so far. Part 3 of my collection continues to be about face makeup products, so this post will include primers, concealers, and powders. Let's get started right away!

(P. S. I added * to products I'm almost done with)


Primers


*1) Smashbox- Photo Finish Oil Free Foundation Primer

  • It's a pore filling primer, it works really well. It's just like Benefit's porefessional except this is completely clear.

*2) Avance+ Mattifying Emulsion- Pore Refiner

  • It smells awesome! I'm not quite sure if this is just skincare. I will reach for this when my face is dry and my pores are really visible.

3) MUFE- Step1 Hydrating Primer
  • This is great during winter when my face is extra dry, it prevents my skin from flaking without being oily
4) Estee Lauder- Matte Perfecting Primer

  • Like the name suggested, it's a mattifying primer. It is pretty hydrating though, it feels really nice on the skin. I don't think it actually mattify my skin through out the day.

5) Maybelline- Baby Skin Instant Pink Transformer

  • This is really different from all other primers I have, it's actually pink. It brightens up the complexion and has SPF. I also don't reach for this, I guess it doesn't really wow me. 

6) Estee Edit- Pore Vanishing Stick
  • My new favorite primer, it glides on so smoothly and fills up my pores. I included this in a couple of my favorites, you can check out my review there.
7) Chanel- Le Blanc Light Creator Brightening Makeup Base
  • Click here for my short review on this primer 
*8) Smashbox- 24 hour photo finish shadow primer

  • I find the formula quite thick. Nothing much to say about it because I don't usually put primer on my lids.

Concealers


1) Maybelline Cover Stick

  • It is really creamy and coverage is really good. However, this shade does not match me that well, too light on me!

2) Bobbi Brown- Creamy Concealer Kit (Warm Ivory)

  • It is super creamy and has great coverage. It melts into the skin easily, I recommend applying this with your fingers so the product will melt into the skin faster and more even. Also, because it is a cream product so I make sure I set it with powder properly.

3) Cover Girl+ Olay- Eye Concealer

  • I don't reach for this product at all. The color is orange based which allows the dark circles to be covered easily. Other than that, I don't find this concealer too special.

*4) Rimmel London- Match Perfection Concealer and highlighter (shade 230 Fair/ Light)
  • My all time favorite concealer, and it is super affordable too!


Powders


1) Rimmel London- Stay Matte Press Powder (Translucent)


  • As you can see, the whole thing is beat up. The lid broke in half, the writings on the cover was rubbed off. The powder hit pan awhile ago, but till now I still can't finish it. The only thing I don't like is the packaging, other than that I love this powder!

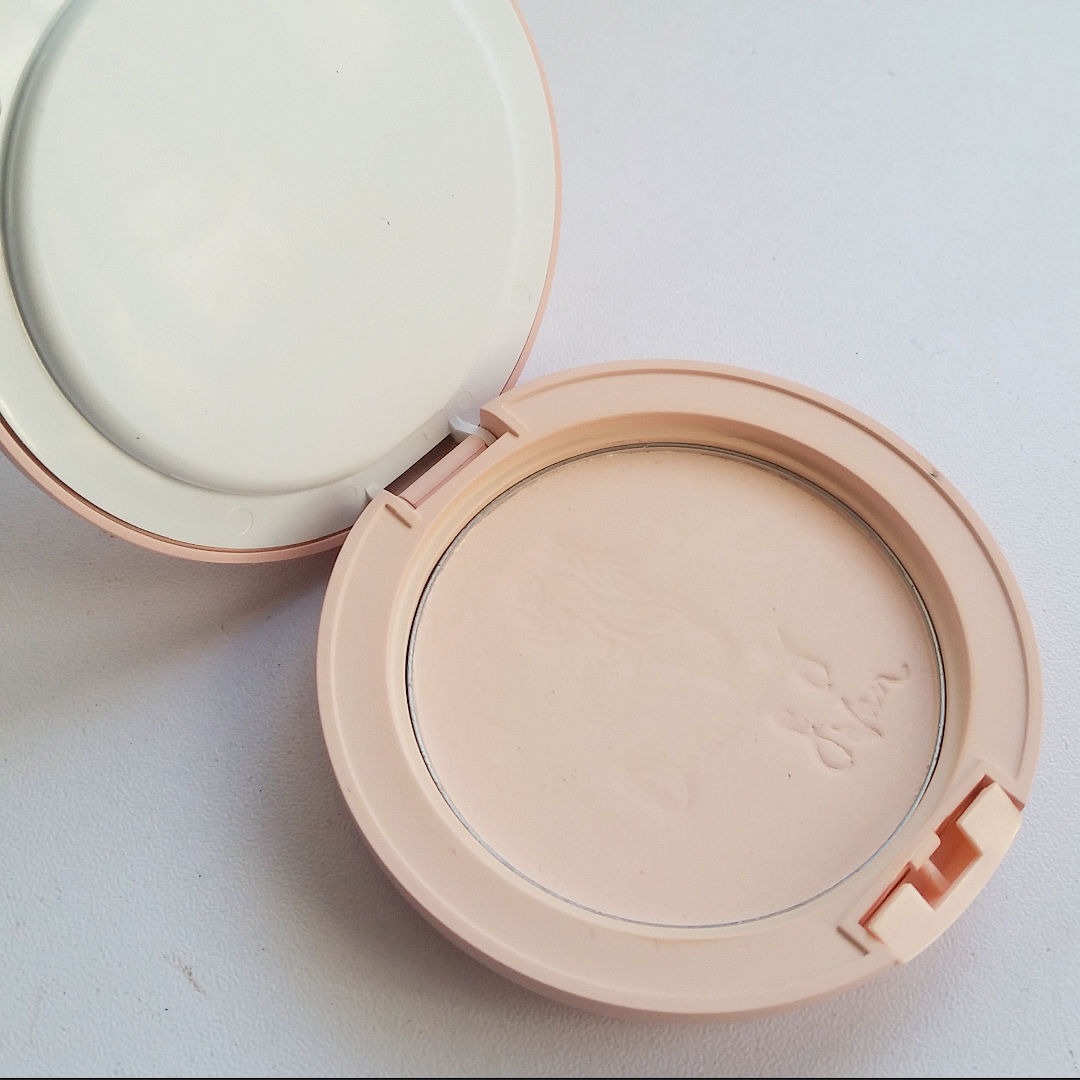
2) Etude House- Dreaming Swan Veiling Pact SPF 25


  • Honestly, I bought this for the packaging. This is from the swan lake collection from Etude house. It's just a normal blotting powder nothing fancy.

3) ELF Cosmetics- Tone Correcting Powder (Cool)


  • Another powder I really like is this ELF tone correcting powder. It evens out my skin tone nicely, and the powder is pretty smooth. This was only $3!

There you go, all about that face! I hope you enjoyed this post, I have quite a lot of primers and I choose them based on the needs of my skin that day but I usually use pore erasing/ filling primers. As for concealer, my favorite has always been the Rimmel London one from the drug store. I finished at least 3 tubes, and every time I buy a new one the packaging changes. My favorite setting powders are also from the drug store, again Rimmel London and also the ELF powder. I've gone through 2 of the ELF powder already!

In case you missed it:
My Chanel Collection (click here)
Part 1: Eyeshadow Palettes collection (click here)
Part 2: Foundation Collection (click here)
Stay tuned for Part 4 of my collection!

Yours Truly,

Ting

Find me here:
Instagram: @judyy116
Twitter: @jtingsdiary
Email: jtingsdiary@gmail.com

*Disclaimer: my makeup collection posts are not meant to brag, I wanted to document what I own and I was also requested to share. I know I have a lot of makeup, I'm trying to downsize and use everything I have, that's why I'm on a no buy!

Sunday, May 22, 2016

May IPSY Glam Bag Unboxing

Hello!

I finally received my Glam bag few days ago! This month, I barely saw any sneak preview of the products from IPSY's Instagram. I only saw a preview of what the bag looks like and I got so excited. Let's get started.


This bag is so unique. It looks like an envelope instead of the usual zippered makeup bag. I think the theme this month is about traveling so the pattern on the bag consists of famous landmarks. The bag comes in three different colors, mine is in the pink one. Super cute!

Wednesday, November 18, 2015

November IPSY Glam Bag Unboxing

Hello!

I am super excited to see my Glam bag in the mail (Finally!) Is it me or IPSY did not post that many hints for the Glam bags lately. I have no idea what to expect this month. I was a bit worried when I picked up my package from my mailbox because the package was super light weight. I thought I might be getting foil packets or tiny samples. Little did I know....


THIS BAG IS AMAZING! Before I even swatch or touch the products, I know it's going to be amazing!

I can't believe it, (For the first time in forever...) there's no skincare, hair care or manicure related things!!!! I mentioned before I don't really use any additional hair products and I am very particular with my skincare products, so I get a little disappointed when I receive them.

This post will only be a haul for you to see what's in the bag, and maybe a little first impression. Since I am way too excited this month's bag, I wanted to share with you before I test it out! Let me know if you want to see a review/ follow up on any of the products.

The first thing I saw was a Smashbox Full Exposure Mascara in Jet black. I am going to insert a photo from Sephora.ca so you can see what the mascara wand look like.
Photo from: Sephora.ca
This is supposed to be a volumizing and lengthening mascara but I have a lot of mascaras that I am currently trying out, so I am going to save this for later. This retails for $22.50 CAD at Sephora.

The next thing in the bag is a single eye shadow in the shade "Carnival" from INSPR Beauty. I have never heard of the brand. I went on to their website at insprbeauty.com to find out more about their products, but I couldn't find the product I received. They have only one type of eye shadow which is the Classic Pressed Eye Shadow with 35 shades. If the eye shadow I received is from the Classic Pressed Eye Shadow line, then this product is meant to be a multi-tasker. You can apply this dry or wet. They said that if applied wet, it will be like a cream shadow or eyeliner. I am excited to give it a try! I believe you can only get this product on INSPR Beauty's website. The full size of the product is $13 USD (BTW, I think what I received is full size because the full size is also 0.05 oz) .


Moving on. This next thing smells super nice, I could smell it before opening the package. It is a Mattifying Emulsion MT+ Sheer from Figs & Rouge. I am kind of confused because it says this line is for flawless effects skincare but it also says it's a primer to prevent shine and filling pores. Now I know I said there were no skincare, but I saw "primer" so I think it should be a primer that actually acts as skincare?! Good thing it says it's for normal to combo skin and for sensitive skin. (Yay! It's calling me) I am going to give this a try, because I really want to know what it is and what it can do for me.

I went on to the company's website at figandrouge.com, there were not prices labelled on it, when I was looking for the price, it actually took me to another page. It took me to feelunique.com and that is where I found out that the full size of this product (30ml) costs £24.00 (About $48.60 CAD) and the product I received was 15ml! How generous !!! I should also mention that this is made in the UK and it is paraben free.

The next item is quite interesting. I have heard about something like this but I have never tried it. It is the Blush Papier by Mai Couture. They are makeup papers, which essentially meant colored blush paper in Human language. Mine is in the color Montecito, which looks like a mauve color with sheen, or like a dusty rose color. The full size contains 50 sheets and you only need 1 sheet for both sides of your cheeks, this retails for $17.50 USD. They also have paper foundation, bronzer, highlighter!  If this thing works, it's going to save me so much space when I travel (or in my handbag)! Then, I don't need to worry about spilling any liquid in my bag or the powder shattering when I run around and the best of all it won't take up any space and don't add any extra weight to my bag! Here is a swatch for you...

photo from: http://maicouture.com/products/blush-papier


I think it's a really cool concept. I tried it on today and it builds up easily. If you are on the go, I suggest you use a very light hand unless you have a blending brush to blend it out. The color turns out to be a shimmery peach. orangy color. It's beautiful! I also tried to do a swatch but somehow my camera just didn't want to focus on the color.. I also want to add that for I only used about half a sheet for both sides of my cheeks plus swatching. A little does go a loooong way because I find that there's too much blush on one side of my cheek. I think a quarter of the blush paper will be good enough for me. By the way, I just want to mention that this is made in Taiwan! (I just have to!) You can check them out on maicouture.com

The last thing in the bag (well ,it was in the bag it was in the envelop). I didn't notice this brush was in the envelop, when I counted the products in the bag I only saw four products. I was so ready to go on IPSY.com to complain then I saw this in the bag (phew..) This is a blending eye brush in no.776 by Bdellium tools.  I have to be honest, when I first saw the brush, I really thought this was meant for water coloring. I guess because I haven't seen any makeup brushes with a yellow handle and white brush head, it really looked like my paint brush. The bristles are super soft, even though I couldn't really tell by just looking at it. But it truly is super soft, it doesn't poke my lids at all. I always wanted more soft and fluffy blending brush. This is just perfect! This brush retails for $9 USD on their website.

This is what the brush looks like.
Studio 776 Blending
Photo from: http://bdelliumtools.com/studio/studio-776-blending.html

Now this concludes my unboxing for my November Glam Bag. As you probably noticed, I am super excited about this bag. This bag contains 4/5 companies I have never heard before that seems to have really awesome products! I can't way to try all of items out and I hope they are as great as I hope they are. This bag was well worth my money, especially when I paid around $20 Canadian (currency difference and shipping). With my estimate, this bag is worth around $66.41 CAD!!!! I am sooooo happy!! If you are also subscribed to IPSY, I hope you got an awesome bag too!


Yours Truly,

Ting.


Find me here:
Instagram: @judyy116
Twitter@jtingsdiary
Email: jtingsdiary@gmail.com

Wednesday, July 29, 2015

July 2015 Favorites

Hello!

Wow, I really can't believe it is almost August! This means that I'm almost done with school and I get to travel again! Let's get started

Here are my July favorites


Tarte Amazonian Clay Waterproof Bronzer in Park Avenue Princess

I received this in my July IPSY Glam bag this month and I absolutely love it, I have been using it almost every day after I got it. You can read my review (here), if you haven't already.

Smashbox Camera Ready BB Cream with SPF 35


I have it in the shade light. I bought this with the Sephora superstar set during Christmas. I'm really happy this is full size! I think I've never mentioned this product on my blog before ( I'm not sure why). Sometimes I use it everyday, sometimes I don't even go near it. The reason is that the bb cream is quite thick, unlike other bb creams that's light weight and runny. I found that it is easy to get too cakey if you apply with your hands or brush. My favorite way to apply it is with my beauty blender. It gives nice coverage, brightens up my complexion and also provide sun protection( very important!!!)  Even though it has SPF, it doesn't give me that white cast when I take flash photo.

With the beauty blender, I can achieve a light weight and medium coverage with the bb cream. I would say it's quite long lasting.

Revlon Lip Butter in Tutti Frutti
Yes it's straight up orange, but it's quite sheer. So when you apply it,  you natural lip color with peek through, for me it creates more of a orangey red color!!!  I love it!

If you are not familiar with Revlon Lip Butter, they are really creamy and most of the color are quite sheer.  Most of them have sparkly glitter but this particular one is just glossy.

CoTz- Face Natural SPF 40 


I did a review on this in my May IPSY Glam bag, read it (here) if you haven already. I have been using this because I've been going to the beach and lake. This is waterproof so I didn't need to worry about it sliding off my face.  This has a sheer coverage but the product is quite thick. I like to apply this with my beauty blender because it is thick and has the consistency of Benefit Porefessional. I would not use this everyday because I typically need more coverage. However, I think this is great in the summer because it is waterproofed and it has SPF.

Be a Bombshell Lip Balm in Ruby


I also got this in my July IPSY Glam bag (here). I have this in my makeup bag since I got it. I really like the sheer coverage with red tint.

Keratherapy Keratin Infused Daily Smoothing Cream


I received this in my June Glam Bag, which I never wrote a post about (Sorry! I never got around to write it, and I think it's too late now, but I have a instagram photo of it here). I hated this product initially because it drives me crazy receiving hair products. However, I read the label and it says that it shortens hair drying time so I gave it a go. Guess what? It actually works! I like to twist my hair up with the towel after I wash them ( just like in the salon) and I'll usually leave it up for a few minutes so I can moisturize my face first. Then I will use squeeze some out and apply to my hair. I start from the end and move up.  It helps that I don't need to spend that much time drying my hair!

That's all for my July favorites. I just realized many things are from my IPSY Glam bag, that means i am actually using those products and they actually have good products! ( not sponsored, I promise!) August is goi to be exciting, I can't wait!

Share with me what you have been loving this month on my Instagram ( @judyy116) and Twitter (@jtingsdiary) or the comments down below!

Yours Truly,

Ting


Find me here
Instagram: @judyy116
Twitter: @jtingsdiary
Email: jtingsdiary@gmail.com

Monday, May 18, 2015

Spring & Summer Simple Everyday Makeup Routine


I rarely wear heavy makeup. In spring and summer especially, I like my makeup as simple as possible. Keep in mind, I have combination skin, dehydrated but occasional oily t-zone and sensitive skin. Some of the products I use may not be suitable for you but can be easily changed up to suit your skin. Also, I will be including the tools I used, just in case you're interested. (Disclaimer: a lot of the brushes you see are from My Makeup Brush Set. This is not sponsored, I purchased a big brush set from the company and I use them a lot!)

Lets get started!

Left to Right: Estee Lauder, Benefit, Maybelline
1. Benefit Porefessional 

I do not use this product all over, instead I focus it in the areas with large pores, like around the nose, chin, and area between the eyebrows. I use my hands for this (clean hands of course), I feel like using my hands can really press the product into the pores and fill them up.

2. Estée Lauder Matte Perfecting Primer
I apply this product on my T-zone using, because it tends to get oily there. This product works well at making sure the makeup stay matte. It has no scent and is really lightweight. If you  have oily skin, you can use this all over the face!

3. Maybelline Pure Mineral CC Cream SPF 37

I always wait for a few minutes for primer to sink in before applying foundation. As the weather becomes warmer, applying foundation can feel heavy. So in the spring and summer time I tend to reach for CC cream or BB Cream. The other day, I accidentally found a new trick that makes my foundation more light weight. That day I forgot to apply moisturizer before applying makeup. So I mixed the Clarins Bi-facial Serum with the Maybelline Pure Mineral CC Cream, it makes the product thinner. It applies smoother and more light weight but the coverage is still the same. I also tried this trick on different foundation, even the Estée Lauder Double Wear. 

Anyways, I use the Maybelline Mineral CC Cream because it has SPF. The product comes out white but as you apply it on the skin, it will turn into skin color. It brightens up my skin, and my skin appears more awake. I like to apply my foundation with my hand but if I need more coverage or my skin is in terrible condition, I will use the Beauty Blender instead. I just find that applying with my hands are much more convenient and it works fine. This CC Cream provides sheer to medium coverage. If you need more coverage, You might want to use BB Cream instead. CC Creams are for Color Correction. 


4. Maybelline  Concealer Cover Stick (light beige)

I have never heard anyone talk about this product. It is a creamy product in a twist up lipstick tube form which makes it easy to handle and carry around. This works on blemishes, scars and even dark circles but I use it mainly for blemishes and scars. In the summer time especially, I don't like full coverage foundations because it tends to feel cakey on the face. Instead, I like to spot treat with concealer. I apply this directly on the needed area and use the flattop foundation brush from My Makeup Brush Set to stipple it in. Because in warmer weather cream product like this becomes softer, so it is much easier to blend out..

5. Rimmel Match Perfection Concealer (light)
I am not a big fan of applying cream products on my eyes, so I use this Rimmel Match Perfection Concealer instead. This is another underrated product that people rarely talk about (Thank you +RachhLoves for introducing this) . It actually works well all over but I like it on my lids and under eyes to brighten them up! The product comes in a squeezy tube with a brush applicator, but it can get really messy. Therefore, I always squeeze it out on the back of my hand and apply it to the eye area with my fingers.


6. Urban Decay Naked Basic


I will be using my favorite eye shadow palette for the next few steps. It's the Urban Decay Naked Palette! This is my favorite because the colors are really wearable (literally!) I was really happy I found a palette like this, I bring it every where when I travel. (I'll do a separate post on this product shortly)

Left to Right: Venus, Foxy, W.O.S, Naked 2, Faint, Crave
For my brows, I mix Naked2(taupe)+ Faint(brown) for a light brown color. I apply it using an Angled Brow Brush and blend it out with a Spooly Brush both from My Makeup Brush Set.

Using the Crown Brushes' Fluffy Eye Shadow Brush, mix Foxy (pale yellow) and W.O.S. (pale nude). I apply this combo on my eye lids and under-eye area, to "set" my concealer. For everyday makeup, I tend to go with neutral colors. This combo serves 2 major purposes, it sets the concealer, provides more coverage for veins and dark circles. It's perfect for no-makeup makeup look. 


Lastly, spray some clean water or makeup mist on an Angled Eyeliner Brush and mix Faint(brown) and Crave (black). Apply this on the lash line as an eyeliner. This will give a "full lash" effect and opens up the the eyes. This is a trick, I have been using for a while because it is easier to control compared to liquid liner, it also looks more natural. Using eye shadow as eyeliner is not a new trick; however, wetting the brush before picking up the shadow color allows the color to show up more bold and last even longer. 

7. Smashbox Contour Palette 
Left: Smashbox contour brush,
Right: Small blending brush

Top to bottom: Highlight, Bronzer, Contour
I apply the contour color using the Smashbox Angled Contour Brush( came with the palette). The way I contour is like drawing a 3 on my face, basically just the temple, cheek bone and jaw line. Also on the side of my nose. and I will blend it all out with a Small Blending Brush.

For high light, I just use another Angled Brush and apply the powder( right) under the brows, down the nose and above my cheek bones. Again, blend it out with the Small Blending Brush.

The trick for a natural contour and highlight is BLENDING. So BLEND, BLEND BLEND!


8.Essence Princess Lashes Mascara

I mentioned in my first few post that I don't like using mascara(Is that normal?!) I decided to include this step because I am trying to use mascara more often, since I found a mascara that works on my lashes. First, I use the lash curler I received in an IPSY bag. The apply a thin coat of the Essence Princess Lashes Mascara. Since I like to keep my makeup simple and natural, I don't go back for a second coat.

9. Dior Addictive Lip Glow (coral/ pink)

Photo from Sephora.ca/ left to right: Original and Coral

I have been obsessed with the Dior Lip Glow, so I always reach for them. I have both the original one and the coral one. To be honest, I literally pick them up randomly from my makeup drawer because both are everyday color that works well with neutral eye look.

10. Rimmel Stay Matte (translucent)


Using my Big Powder Brush, I pick up the translucent powder and tap it on my arm to get rid of extra powder. I then apply it on my face starting with the t-zone, this is where it's most needed and the majority of the powder will be on here. Using the left over product, I will lightly dust over other areas. If you have dry skin like me, I recommend "spot set" your makeup with powder and use a setting spray on the rest of the face.

Last step is something a lot of people forget, but I find it important. I like to finish my routine with brushing off excess makeup my large fan brush so I won't look all powdery.


That's it, I'm ready to go! It's usually take me about 5 to 10 minutes to finish my makeup so if you are in a hurry or does not like using too much product, you can try this routine out! Share with my your favorite makeup product in the comments below and share this post if you liked it! Thank you :)


Yours Truly,


Ting


Find me here:
Instagram: judyy116
Twitter: judyting116